Nissan Juke Service and Repair Manual : CVT fluid
Inspection
CHECKING CVT FLUID
The fluid level should be checked with the fluid warmed up to 50 to 80°C (122 to 176°F). The fluid level check procedure is as follows: 1. Check for fluid leakage.
2. With the engine warmed up, drive the vehicle in an urban area.
When ambient temperature is 20°C (68°F), it takes about 10 minutes for the CVT fluid to warm up to 50 to 80°C (122 to 176°F).
3. Park the vehicle on a level surface.
4. Apply parking brake firmly.
5. With engine at idle, while depressing brake pedal, move shift selector throughout the entire shift range.

6. Pull out the CVT fluid level gauge from the CVT fluid charging pipe after pressing the tab on the CVT fluid level gauge to release the lock.

7. Wipe fluid off the CVT fluid level gauge. Insert the CVT fluid level gauge rotating 180° from the originally installed position, then securely push the CVT fluid level gauge until it meets the top end of the CVT fluid charging pipe.
CAUTION:
When wiping away the CVT fluid level gauge, always use
lint-free paper, not a cloth rag.

8. Place the selector lever in “P” or “N” and check that the fluid level is within the specified range.
CAUTION:
When reinstalling CVT fluid level gauge, insert it into the
CVT fluid charging pipe and rotate it to the original installation
position until securely locked.

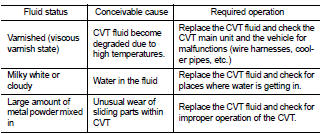
CVT FLUID CONDITION
Check CVT fluid condition.
• If CVT fluid is very dark or smells burned, check operation of CVT. Flush cooling system after repair of CVT.
• If CVT fluid contains frictional material (clutches, brakes, etc.), replace radiator and flush cooler line using cleaning solvent and compressed air after repair of CVT. Refer to TM-297, "Exploded View".


Changing
CAUTION:
Replace drain plug gasket with new ones at the final stage of the operation when
installing.
1. Remove drain plug from oil pan.
2. Remove drain plug gasket from drain plug.
3. Install drain plug gasket to drain plug.
CAUTION:
Never reuse drain plug gasket.
4. Install drain plug to oil pan.
Drain plug – tightening torque : Refer to TM-283, "Exploded View".
5. Fill CVT fluid from CVT fluid charging pipe to the specified level.
CVT fluid : Refer to TM-308, "General Specifica- Fluid capacity tion".
CAUTION:
• Use only Genuine NISSAN CVT Fluid NS-2. Never mix with other fluid.
• Using CVT fluid other than Genuine NISSAN CVT Fluid NS-2 will deteriorate in driveability and CVT durability, and may damage the CVT, which is not covered by the warranty.
• When filling CVT fluid, take care not to scatter heat generating parts such as exhaust.
• Sufficiently shake the container of CVT fluid before using.
• Delete CVT fluid deterioration date with CONSULT-III after changing CVT fluid.
6. With the engine warmed up, drive the vehicle in an urban area.
NOTE
:
When ambient temperature is 20°C (68°F), it takes about 10 minutes for the CVT
fluid to warm up to 50 to
80°C (122 to 176°F).
7. Check CVT fluid level and condition.
8. Repeat steps 1 to 5 if CVT fluid has been contaminated.
 Idle neutral control learning
Description
TCM corrects an individual difference in clutch clearance of the transaxle
assembly by performing the idle neutral
control learning and enables accurate idle neutral control.
Theref ...
 Stall test
Inspection and Judgment
INSPECTION
1. Inspect the amount of engine oil. Replenish the engine oil if necessary.
2. Drive for about 10 minutes to warm up the vehicle so that the
CVT fluid temperatur ...
Other materials:
A/C switch
Component Function Check
1.CHECK A/C ON SIGNAL
With CONSULT-III
1. Turn ignition switch ON.
2. Select “AIR CONDITIONER” of “BCM” using CONSULT-III.
3. Select “AIR COND SW” in “DATA MONITOR” mode, and check status under the
following condition.
Is the inspection result normal?
YES >> ...
P0102, P0103 MAF SENSOR
DTC Logic
DTC DETECTION LOGIC
DTC CONFIRMATION PROCEDURE
1.PRECONDITIONING
If DTC Confirmation Procedure has been previously conducted, always turn
ignition switch OFF and wait at
least 10 seconds before conducting the next test.
Which DTC is detected?
P0102 >> GO TO 2.
P0103 & ...
Power supply and ground circuit
A/C auto AMP. : Diagnosis Procedure
1.CHECK SYMPTOM
Check symptom (A or B).
Which symptom is detected?
A >>GO TO 2.
B >>GO TO 5.
2.CHECK FUSE
1. Turn ignition switch OFF.
2. Check 10A fuse (No. 3, located in fuse block (J/B)].
NOTE:
Refer to PG-22, "Fuse, Connector ...
